At first glance taking a semi-transparent image and adding a colour behind it to create a themed entities should be easy.
The problem is that any entity you want to colour may have its own shape and clipping paths do not allow for partial transparency.
Opacity masks are the answer and are very strighforward to use but can be confusing ...
Confusing simply becuase of how you work with an image editor (like GIMP) to create the mask.
Step One: Selecting an image.
For this example we are only interested in applying one colour, but in reality you can use gradients and even other images as the colour source.
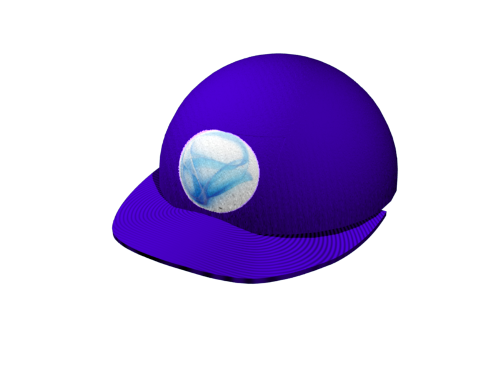
Here I use the Silverlight cap created for facemonkey, note I am using the resultant image file not rerendering anything.
The goal is to create a copy of the cap without the blue instead showing any colour we wish to substitute, while ensuring the SL logo remains intact.


Step Two: Identifying what is required.
We need three layers:
The background image that will retain the SL logo.
A colour fill, we will just use a rectangle in the XAML.
The opacity mask.


Step Three: Creating the background image.
This is what shows through when the opactity is 0. Copy the cap image to a new layer and set the staturation to -100 (Colors/Hue-Saturation).
Copy the SL logo from the original onto the now black and white image.
Step Four: Creating the mask.
Copy the original cap and remove all the colour (again), using a solid black brush remove the SL logo and then fill in the all the empty space around the cap with black.
Now invert the colours in the image (Colors/Invert).
Map the colour information to Alpha (opacity) (Colors/Color to Alpha) and set the colour used to white, the background should become completely transparent.


Now a quick word about why step four was needed, feel free to skip this.
The transparent parts of the mask will make the Color layer transparent (like a clipping path) and the opacic areas will take-on the colour this means that the background image can show through.

Step Five: Xamling it all up.
This is the really easy bit. Add a Canvas with an Image and a Rectangle. Set the Image Source to your background image (the black and white one with the colour SL logo).
Set the Rectangle Fill to Red (or what ever colour you need) and add an OpacityMask to the Rectangle containing an ImageBrush that has the ImageSource set to the mask image.
Thats it.


Step Six: Profit
Or just play with the Silverlight below.
Background image used Opacity image used a lighter background image to use
![[Pay4Foss banner long]](http://pay4foss.org/pay4foss_bar.png)